Hills aren’t just a one-way challenge. Once up, you have to get down. Here’s part one of our guide to improving your descending.
As I stated earlier in this series, one of the key areas of sportive success is to have good descending skills. Having trained as hard as possible to get up the hills as quickly as you can, you don’t want to lose all the time you’ve gained by not being able to successfully negotiate the descents. There’s also a very significant safety element to competent descending, as many sportives feature technically demanding downhill sections. Getting these wrong can have disastrous consequences for you and other riders around you, so take the time to practice your descending skills – they could save your life as well as precious minutes.
As we’ve done with other key skills in this series, the best place to begin is by splitting descending into its component parts. For descending these are:
Observation
Road positioning
Anticipation – setting yourself up for braking, gear selection etc
Body position – Technical descents – Where should your arms, legs and head be positioned to get you through the bends
Aerodynamics – not all hills have bends and you can make up a lot of time by being aerodynamic on the descents
Group descending skills
So let’s start with a look at these in turn
1) Observation
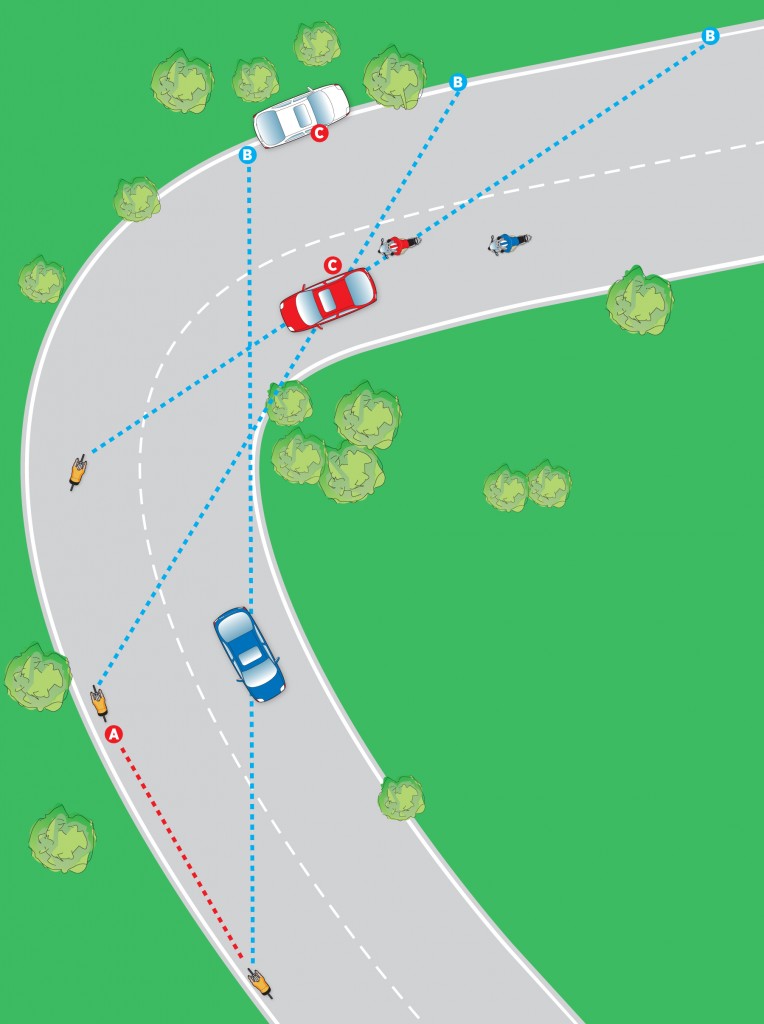
Good observation when descending is a key skill. The biggest mistake that riders make in this area is looking at the road directly in front of them rather than further along the road and through the bends ahead. Look at Diagram 1 and you can see that the rider approaching the bend shouldn’t be looking at ‘A’, but at ‘B’ which represents a point as far around the corner as they can see. Point ‘B’ is also not static; as the rider moves around the bend this point also moves, so our rider is continually adjusting the point of view to look as far ahead as possible down the road.
What you’re looking for is not simply the smoothest and quickest line through the bend but also to identify hazards that can slow you down or potentially bring you off the bike. Potholes, gravel, traffic, animals, other riders, any number of things can influence where you might need to position yourself on the road.
On identifying any adverse condition, be sure not to make the next biggest mistake and keep looking at it. If our rider target fixates on either of the point ‘C’s (the parked car or the oncoming traffic) thinking to themselves “I’ll be sure I avoid that” they actually increase the chance of riding into them. On spotting any obstacles you want to avoid, deal with them by keeping aware of them in your peripheral vision but force yourself to look where you want to ride, not where you don’t.
While this all sounds like (and indeed is) common sense, it’s not so easy to do with a bend rushing toward you at 30mph on a steep downhill, so practice it on a series of bends at lower speed on flatter terrain in your training. Force yourself to keep looking around the bend as far as possible while gradually increasing your speed.
2) Road positioning
Along with aerodynamics on the straight sections, your position on the road when approaching, riding through, and exiting bends are the key factors in getting you down the hill quickly and safely.
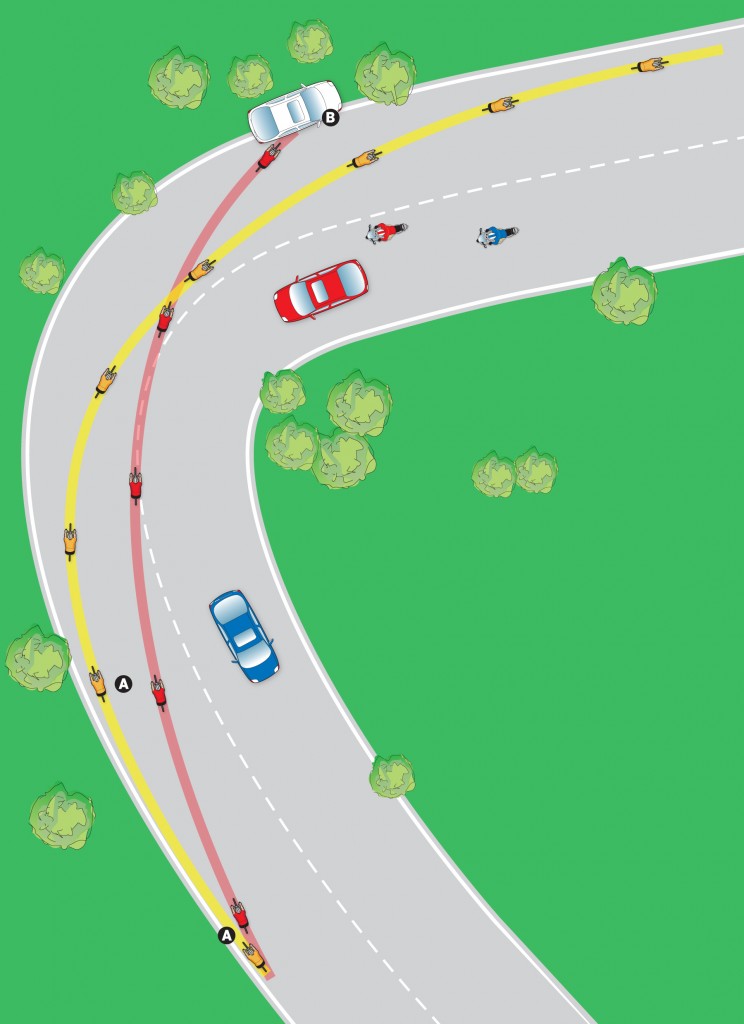
The most common mistake riders make is turning in too early in approaching the bend. For an example, look at Diagram 2. The rider in red has turned in too early at point (A). This means they can’t see as far through the bend as the rider in yellow who remains on a wider line and can see further down the descent, which allows a better analysis of the amount of braking required, a wider picture of any hazards and what gear to choose for the exit.
The consequence of this for the rider in red is that they might at best need to pull hard on the brakes, loose a lot of speed and even come to a standstill in order to make it round the bend or at worst hit the parked car at point (B). From the wider position the rider in yellow can pick a line close to the apex and wide again on the exit, which is not only quicker but safer. There’s less chance of running into the parked car or of a following rider running into the back of them if they’d been forced to brake hard due to being on the wrong line.
Next week we’ll look at how to use brakes and gears to corner quickly and the differences that body position and weight adjustments can make to your control, confidence and corner speed on descents.
Part 1: Going for Centuries
Part 2: Breaking down the barriers
Part 3: Goal setting
Part 4: Intensity
Part 5: Get in the Zone
Part 6: Performance Testing
Part 7: Creating a training plan
Part 8: Weekly training plans
Part 9: Be a better climber
Part 10: Improve your pedalling
Part 12: More descending skills
Part 13: Upping the pace
About the author:
Huw Williams is a British Cycling Level 3 road and time trial coach. He has raced on and off road all over the world and completed all the major European sportives. He has written training and fitness articles for a wide number of UK and international cycling publications and websites and as head of La Fuga Performance, coaches a number of riders from enthusiastic novices to national standard racers.
Contact: [email protected]